Blog
August 8, 2024

Zend is excited to announce the immediate availability of the ZendPHP Ansible Playbook, an automation utility designed to streamline Zend Server to ZendPHP deployment for IBM i systems. This Playbook will allow you to quickly provision ZendPHP and consistently deploy applications at scale using existing Zend Server processes.
In this blog, we will walk you through the steps for installing and configuring the ZendPHP Ansible Playbook and related Python modules, which is the prerequisite software for using the ZendPHP Ansible Playbook for IBM i tool.
Make Your Zend Server Migration Plan
Zend Server EOL arrives in 2027. Luckily, migrating to ZendPHP + ZendHQ has never been easier, including for IBM i systems. Learn more about your options, how migrating now will benefit your business, and methods for future-proofing your stack.
Why Migrate from Zend Server to ZendPHP?
ZendPHP, when paired with the ZendHQ extension, delivers the building blocks your IBM i team needs to create modern, scalable, and secure web applications. Working together, ZendPHP and ZendHQ provide scheduled security patches, advanced debugging capabilities, unmatched observability, intuitive orchestration tooling, job management and deployment functionality, and so much more.
Back to topRest Easy With Secure and Supported Runtimes
ZendPHP runtimes keep your mission-critical PHP applications secure, compliant, and performing at a high level. Learn more about how ZendPHP and ZendHQ can benefit your IBM i app, or start a free trial today.
ZendPHP Deployments Using the Ansible Playbook
The ZendPHP Ansible Playbook (zpk2ansible) is a command line utility that builds an Ansible Playbook based on a Zend Server deployment package (ZPK) to deploy the application to the server. Visit this blog post to learn more about the development of the ZendPHP Ansible Playbook.
The tool is written in Python. Supported operating systems include Linux and IBM i, and the playbook requires:
- Ansible-core version 2.11 or newer (installed v2.15)
- The zpk2ansible tool relies on the ansible.builtin.split filter plugin, a part of the ansible-core and included in Ansible installations
Before Beginning Your Zend Server to ZendPHP Deployment
Before beginning your Zend Server to ZendPHP deployment using Ansible, there are a few prerequisites you will need to address. Use these steps to get started.
Downloading IBM i ACS Access
Begin by downloading the IBM i Access Client Solutions (ACS) Open Source Package Management utility. This utility is the preferred way for install open source related software on IBM i servers. As ACS is required, please see the associated documentation for installation instructions.
To begin, download the latest Base Package, IBMiAccess_v1r1.zip, from the IBM website. IBM recommends using a 'bash' shell for SSH connections:
- SSH sessions runs 'bash' shell
- QP2TERM uses the 'sh' shell
- Change the default IBM i shell to 'bash'
Next, use a SQL client interface, STRSQL or iACS RunSQL
CALL QSYS2.SET_PASE_SHELL_INFO('*DEFAULT','/QOpenSys/pkgs/bin/bash’)
Use the 'chsh' package.
/QOpenSys/pkgs/bin/chsh -s /QOpenSys/pkgs/bin/bash
For 'bash' shell troubleshooting tips and processes, please visit this IBM i guide.
Installing Python ACS or yum command
Python v3.9+ is required to use the Ansible collection at release 2.14 and up. The following modules and packages must be installed using QP2TERM or any SSH terminal:
yum install gityum install python39yum install python39-pipyum install python39-develyum install python39-cryptographyyum install python39-paramikoyum install pase-utf8-localeyum install sshpass(# allows specifying ssh password if desired)
/Qopensys/pkgs/bin/yum install git python39 python39-pip python39-devel python39-cryptography python39-cryptography python39-paramiko pase-utf8-locale sshpass
Python-39 is also available via the IBM i ACS Open Source Package Management. Launch the IBM i ACS, then select Open Source Package Management, as pictured below.
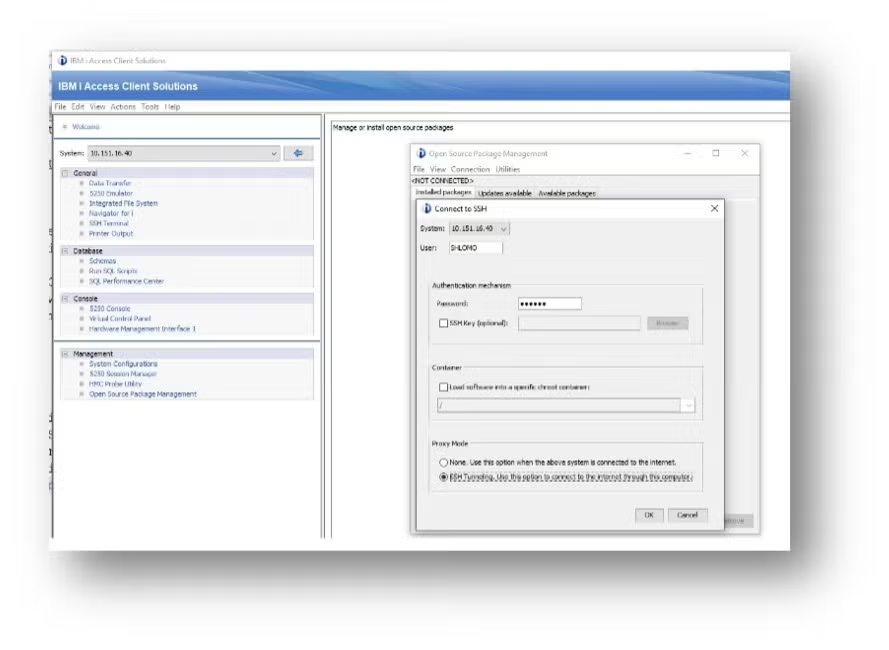
Once the Open Source Package Management Utility is Available, select the Available Packages tab. Scroll to locate 'python 39,' then click the install button.
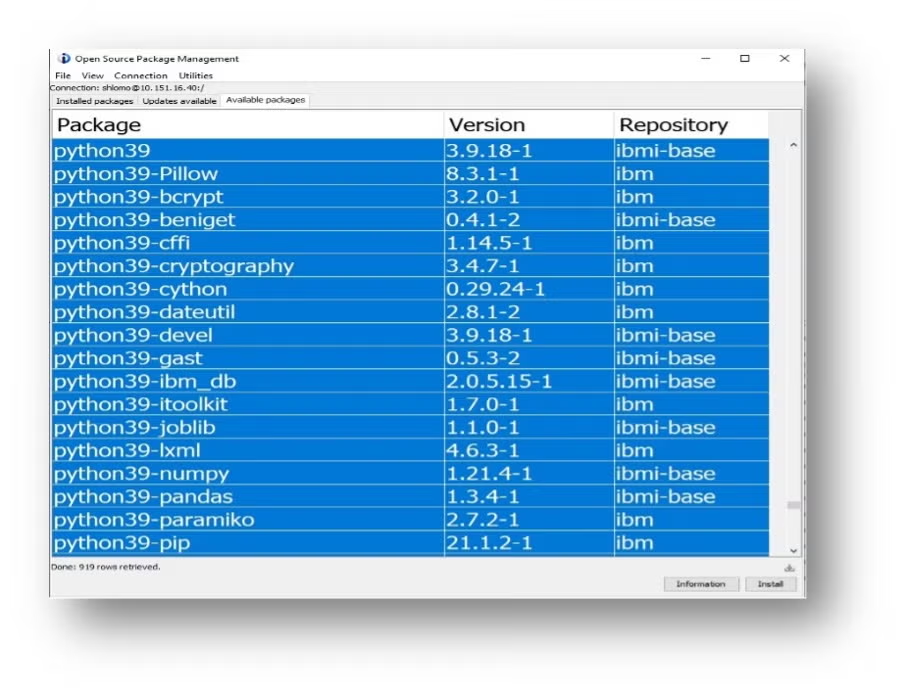
Follow the install screen and wait for the 'completed' message.
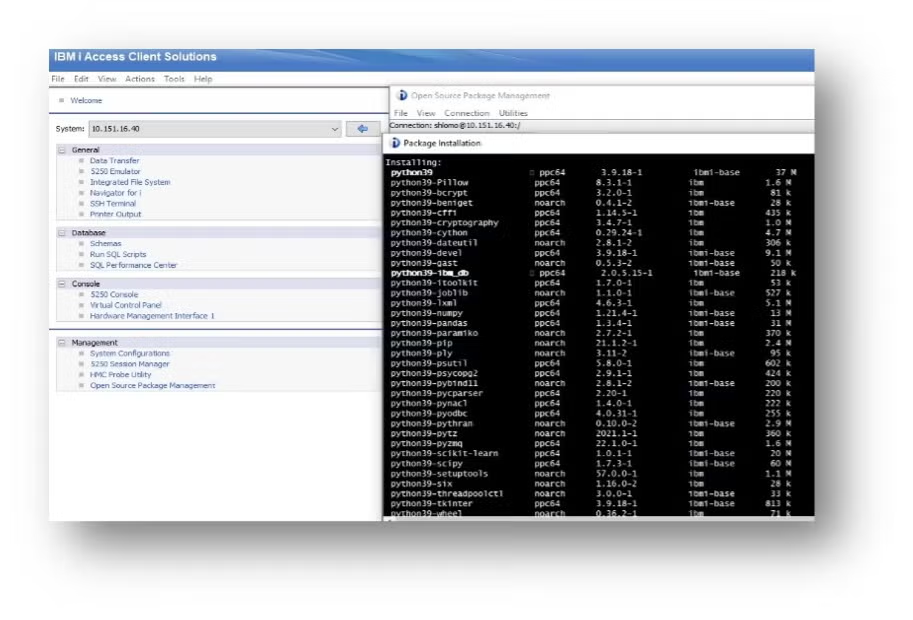
From the Open Source Package Management Menu, select the 'Installed Packages' tab. Then select 'View' followed by 'Refresh' or press F5 to refresh the list.
Install Ansible Using Python pip Command
For an IBM i Ansible Control node, the latest package levels of Ansible v2.14 or v2.15 are required and should be installed with python pip command or another package manager supported by your operating system, such as apt or yum.
Please note, the Open Source Package Management offers Ansible pre-packaged v2.9 only, which is not suitable for our zpk2ansible installation.
We recommend installing Ansible with pip, with full Ansible recommended and Ansible-core as an alternative.
Full Ansible
To install full Ansible at 7.X (v2.14 core) or 8.X (v2.15 core), use Python pip. To install level 8.1 that includes v2.15.6 Ansible-core, use the following command:
python3.9 -m pip install --user ansible==8.1
Ansible-core
To install Ansible-core instead of full Ansible, some additional IBM i dependent collections may need to be installed via Ansible-galaxy.
To install Ansible-core v2.15.1, use the following command:
python3.9 -m pip install --user ansible-core==2.15.1
Ensure that all dependent collections installed correctly.
Use the Ansible-Galaxy Command
Use the Ansible-galaxy command in the package manager for Ansible to install a collection from Ansible Galaxy. Begin by using the following command to list installed collections:
ansible-galaxy collection list
If it doesn't show on the list, perform the following collection install commands:
ansible-galaxy collection install community.general
ansible-galaxy collection install openstack.cloud
ansible-galaxy collection install ansible.posix
Configure the /home/user/.profile file for language environment variables and Ansible path.
export PATH
export LANG=en_US.UTF-8
export LC_ALL=en_US.UTF-8
export PATH=~/.local/bin:$PATH
/home/user/.local/bin:/QOpenSys/pkgs/bin:/opt/zend/zendphp/bin:/QOpenSys/usr/bin:/usr/ccs/bin:/QOpenSys/usr/bin/X11:/usr/sbin:.:/usr/bin:
Back to topOn-Demand Webinar: Simplify Your Zend Server to ZendPHP Migration With the New ZendPHP Ansible Playbook
Follow along with this on-demand webinar for a live-action look at how to simplify your Zend Server to ZendPHP migration with the New ZendPHP Ansible Playbook.
zpk2ansible Installation & Usage
Installing and using zpk2ansible for IBM i can be completed in a few simple steps. For more information about the playbook, check out the full documentation.
To start, use the Zend Server provided zdpack tool to create your application's .zpk file:
/usr/local/zendphp74/bin/zdpack create /www/zendphp74/htdocs
/usr/local/zendphp74/bin/zdpack pack /www/zendphp74/htdocs
Using QP2TERM or any SSH terminal, set up a Python venv virtual environment to run the utility (python3.9-venv is installed with the python39 core).
python -m venv venv
source venv/bin/activate
Next, install the zpk2ansible utility inside the venv environment.
wget https://repos.zend.com/zendphp/zpk2ansible/zpk2ansible-latest.whl
venv/bin/pip install ./zpk2ansible-latest.whl
venv/bin/zpk2ansible --version
To run the playbooks, add target IBM i in a text file named hosts_ibmi.ini or inventory.ini. The .ini file describes the targets to which you are deploying your application. Here is an inventory.ini example:
[myhosts]
10.151.17.45 ansible_ssh_user=shlomo ansible_ssh_pass=xxxxx
10.151.16.35 ansible_ssh_user=shlomo ansible_ssh_pass=xxxxx
[myhosts:vars]
ansible_python_interpreter="/QOpensys/pkgs/bin/python3“
ansible_ssh_common_args='-o StrictHostKeyChecking=no’
Check the inventory.ini, then ping the server to verify connection:
ansible-inventory -i inventory.ini --list
ansible myhosts -m ping -i inventory.ini
zpk2ansible Command Structure
Usage: zpk2ansible [OPTIONS] COMMAND [ARGS]
Options include:
version- show the version and exithelp- show this message and exit
venv/bin/zpk2ansible –help
venv/bin/zpk2ansible –version
Commands include:
build- Builds Ansible playbook file from a ZPK fileinspect- inspects a ZPK file used by Zend Deployment tool to deploy PHP
venv/bin/zpk2ansible build /path/to/your/myapp.zpk
venv/bin/zpk2ansible inspect /path/to/your/myapp.zpk
Zpk2ansible Inspect command then inspects the .zpk file created using zdpack tool:
venv/bin/zpk2ansible inspect /path/to/your/myapp.zpk
The output for this command will include various details for the given .zpk file, such as dependencies, status of existing webserver vhost and PHP-FPM pool configurations, overrideable parameters, and, most importantly, a sample build command for the playbook.yaml generation. The inspect command will also notify the user of invalid ZPK items, such as directory, file, or inspection.
Sample Build Commands
In addition to specifying the interactive mode or the chosen web server, this sample command demonstrates how you can override variables in the .zpk file. Here are examples of sample build commands created with the inspect command:
zpk2ansible build htdocs-0.1.zpk htdocs-0.1.com --interactive --nginx --appdir /var/www/htdocs-0.1 --user www-data -v locale="None" -v db_host="None" -v db_name="htdocs" -v db_username="root" -v db_password="None" -v skip_base="false"
Add a virtual host name for the Apache vhost configuration, change directory location, and change username:
(vhost {the second parm after the .zpk name} / --appdir {application directory location} / --user {use a valid IBM i user name} )
Deploy Your Application
Begin by building and creating the ZendPHP Ansible Playbook:
venv/bin/zpk2ansible build /path/to/your/myapp.zpk
Implement a sample build command for IBM i:
venv/bin/zpk2ansible build /home/shlomo/htdocs-0.1.zpk VhostName.com --interactive --appdir /www/SV2ansible/ --user shlomo -v locale="None" -v db_host="None" -v db_name="htdocs" -v db_username="root" -v db_password="None" -v skip_base="false"
The playbook.yml will be created in the current working directory (CWD). Now, run the Ansible playbook.yml created with the above build command to deploy the .zpk file. Use the created hosts_ibmi.ini or inventory.ini.
ansible-playbook -i inventory.ini playbook.yml
This should result in the application installed to the selected directory, /www/SV2ansible.
The suggested Apache virtual host configuration file apache.conf should be created under the named directory. Check and modify the virtual host apache.conf suggested directives as needed.
The Include directive will be added to the/www/zendphp/conf/httpd.conf Apache configuration, as well as the optional/www/zendphp/conf/vhosts/*.conf.
The directory names vhosts will create under/www/zendphp/conf, containing a symlnk to the virtual host apache.conf configuration.
Manually add the listen to ip:port command to/www/zendphp/conf.
Listen *:10281
Listen *:10280
Back to top
Final Thoughts
Migrating from Zend Server to ZendPHP will keep your application secure, compliant, and delivering excellent results for end users. With Zend Server 2019 having reached end of life, the time has never been better to begin your Zend Server IBM i migration to ZendPHP using tools such as zpk2ansible. To ease the strain of migration, we recommend completing this process in stages. For example, to migrate from Zend Server 2019 to ZendPHP, you may need to first temporarily upgrade to Zend Server 2021.
No matter your plan, Zend is here to help. Our expertise is at your disposal. Reach out today with questions or to begin your migration to ZendPHP.
Back to topStreamline Your Zend Server IBM i Migration
Make the Zend PHP experts your PHP experts. Our services are built to streamline your Zend Server to ZendPHP migration through ongoing support and deployment tools for IBM i such as the ZendPHP Ansible Playbook.
Additional Resources
- On-Demand Webinar - The Peaks and Valleys of PHP Containerization and Orchestration
- On-Demand Webinar - Choosing the Right PHP for Your IBM i
- Datasheet - ZendPHP
- Datasheet - ZendHQ
- White Paper - Modernizing IBM i
- Blog - How to Install (and Configure) Ansible to Deploy a PHP Application
- Blog - Exploring ZendHQ for IBM i
- Blog - Configuring PostgreSQL With ZendHQ on IBM i